Dan Marina
First-time Setup
Full instructions on hooking up all sensors, servos, etc.
-
For any issues, refer to the Troubleshooting docs
-
For info on handling our batteries
Mounting
Windvane
The green p3022 encoder is directional and must be oriented in-line with the boat to be accurate!
- Align the encoder's single screwhole to face the center bow of the boat.
- Rotate the encoder shaft so the flat section lines up with the single screwhole
- Attach the windvane on top of the shaft with the front aligned the flat section (0/360° should indicate being in irons)
IMU
The BNO055 IMU is also directional!
- Assuming no offsets, the 0°-point aligns with the y-silkscreen axis forward. Align this side with the center bow-line of the boat. - If this cannot be done, then offset the angles in software so that 0/360° matches with the boat facing North.
Wiring
These components are relatively straightforward and just need to be plugged into the right connectors.
IMPORTANT: Avoid hot plugging anything on the PCB, if you want to plug something in you MUST cut power
- Note: JS/RS/MS/A1 connect to the 5-7.5V buck. A2/A3 connect to the 5V buck. Be careful to not accidentally plug any 5V components into the JS/RS/MS/A1 headers when using a 7.5V buck.
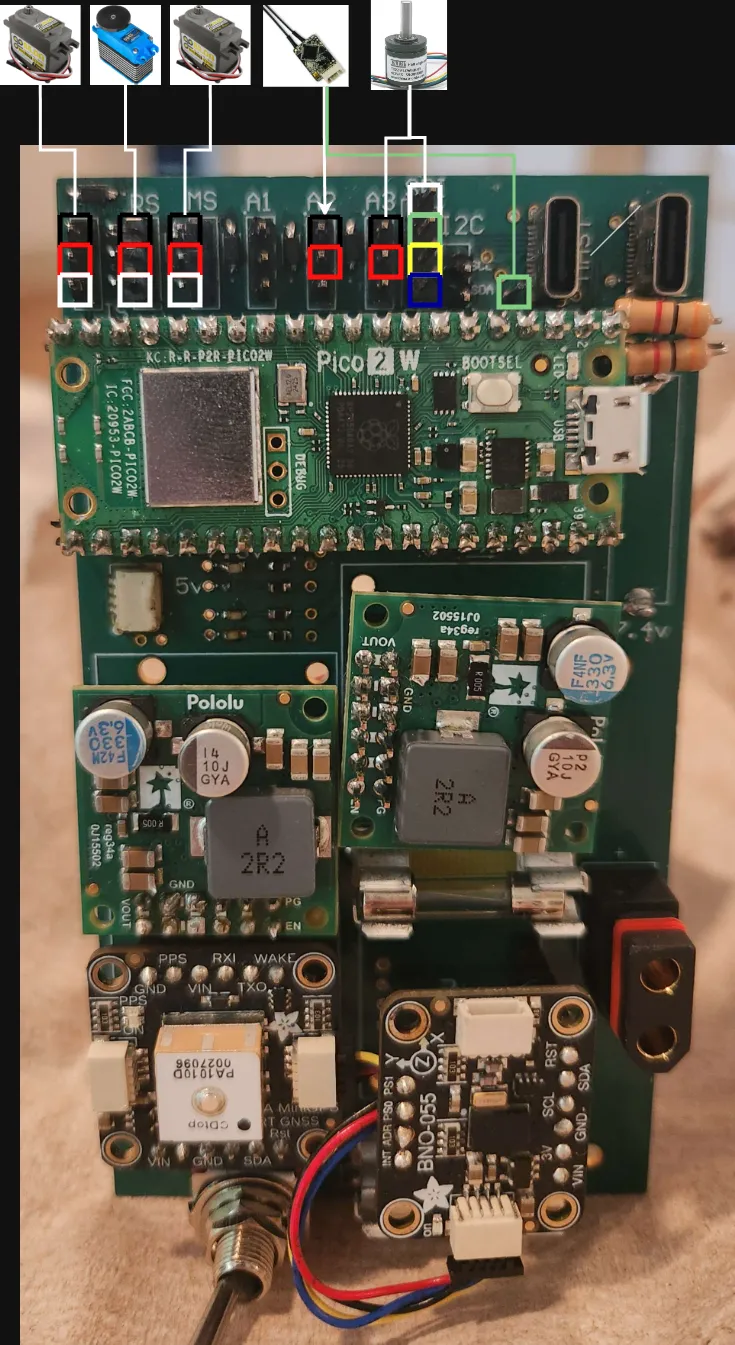
- Connect a USB-A to USB-C from the PCB buck converter to the Pi5
- Connect a USB-A to micro-USB from the Pi5 to the Pico2
- Connect the SBUS receiver to 5V, GND and Pico2 UART_RX
- Connect the Jib, Sail and Rudder servos
- Slot in the two buck converters
- Use 5V for the dragonforce servos
- Use 7.5V for the dan marina servos
- Slot the GPS into the left header
- Slot the IMU into the right header
- Daisy chain the JST-SH cable between the GPS and IMU
- Plug in the battery to the XT60
- Can handle 7.6-60V (in theory) ideally 12.6V
Hot Start
All components are plugged in and the boat just needs to be powered on.
Calibrate the IMU
Every time the boat is powered on, the BNO055 IMU must be calibrated before it will be accurate.
- Magnetometer: Move the sensor in a figure-8 pattern until it begins reading values.
- Gyroscope: Leave the sensor still for a few seconds
- Accelerometer: Should calibrate automatically after a second.
Run ROS2
- Connect your laptop to the
Sailnet 2.4GWi-Fi access point or your own hotspot.- Password is
PittSailbot, admin for router isSailbotand can be accessed at192.168.8.1 - (Optional) Make sure everything is working up to this point by following the first 3 steps in Wifi Connectivity
- Password is
- On your laptop open a terminal.
- SSH into the Pi. The command looks like this:
ssh <user>@<Ip address>- The following are subject to change:
- The usernames for the two Pi5s are sailbot or pi
- You can also use our tailnet to connect to the Pi5 on any two networks so long as both can access the internet (ex. 2 phone hotspots)
- Pi5:
ssh <user>@<ip>orssh <user>@<tailnet-machine-name> - The passwords for both are
sailbot - If the Pi doesn't connect to a phone hotspot or our router then you'll need to connect a monitor and keyboard to the pi.
- Run the Docker container
cd ~/Sailbot
python3 ./utils/docker.py run
# you should now be in a docker terminal and see /workspace# to the left of your cursor, if not look for error messages
# you can type "exit" to leave the docker terminal and return to your normal terminal if you need to.
- Note: You can use
tmuxto host the terminal on the Pi5. This will prevent the ssh session from being destroyed if your computer disconnects from the Pi5.
- Compile ROS2
. compileDocker.sh
- Run the relevant ROS2 nodes
ros2 launch sailbot boat_all.launch
OR alternatively, run the specific nodes you want directly:
ros2 run sailbot mcu_bridge
ros2 run sailbot tack_navigation
ros2 run sailbot website
Alternative Setups
Running with local laptop
Replace the Pi5 by running the ROS2 autonomy stack on any Windows device.
- Plug in Pico2 USB to laptop
- Attach the Pico2 to WSL2
- Ctrl + Shift + P > Rebuild & Reopen in Container
- Run
. compileDocker.shto compile ROS2 - Run the relevant nodes:
- mcu_bridge
- navigation
- website